Hearing about this topic must have made you think a lot about it, especially about how to move ahead to successfully set up WordPress on YouStable VPS Server using Server Avatar.
It’s not easy for a non-techy person to set up an unmanaged VPS (Virtual Private Server) and install WordPress in it later.
To invest your precious time unnecessarily on something that you don’t really know or make it complicated for yourself will not be worth it.
Hence, ServerAvatar was introduced to us! A platform that helps install WordPress within minutes and without running a single command.
Here’s a detailed tutorial for you to go through and set up WordPress in your unmanaged VPS server within minutes and without any hassle!
What is ServerAvatar?
ServerAvatar is a Server Management Platform used to set up WordPress on an unmanaged VPS Server. Developed by Adarsh Sojitra, he aimed to provide easy and effective working on the unmanaged server.
ServerAvatar skips all the technical go-through so that the user doesn’t have to face difficulty or pain in setting up their server first and then installing WordPress on it. ServerAavatar skips this for the user and gets the server ready to install WordPress in no time!
Why use the Server avatar?
As discussed earlier, ServerAvatar helps the user install WordPress on an unmanaged VPS server.
Now, Do you know what an unmanaged VPS server is?
If not, let us explain it to you. An unmanaged VPS server is a Virtual Private Server that allows private spaces for all the users on the server.
A mixture of shared hosting and a dedicated server with dedicated resources and reasonable prices, VPS hosting is one of the best hosting one can opt for.
And an unmanaged VPS hosting is when the hosting provider only offers the root and password of the server to the customer, and the rest of everything is left to the customer to do according to themselves.
How to Setup WordPress on YouStable VPS Server Using ServerAvatar
This is a step-wise explanation of how to set up WordPress on YouStable’s unmanaged VPS Server using Server Avatar:
1. Create a Server on YouStable
How to buy a semi or unmanaged VPS hosting from YouStable? Purchasing a VPS hosting by YouStable will automatically create a space for you on the server.
Steps to buy the web hosting:
- Visit https://www.youstable.com/vps-hosting
- Choose a plan of your choice
- Do not forget to choose the “Ubuntu” Operating system because it’s the only compatible OS with ServerAvatar.
- Purchase it from YouStable
- Process the payment
- Immediately receive confirmation of your order from YouStable’s end.
Tada, the unmanaged VPS hosting with root access by Youstable is yours.
2. Point your domain to Server IP
There are two ways in which you can easily point your domain to your server’s IP. Let’s elaborate on them for a better understanding:
Option 1: By DNS Management from DNS Registrar
The steps to point your domain to Server IP on YouStable: go to your domain registrar or YouStable (if YouStable is your domain registrar).
- Log in to your YouStable Client Area..
- After entering your email and password, the page will lead you to the Client’s Dashboard.
- The number of domains you have registered under YouStable will start reflecting like this:
- After clicking on the ‘Domains’ box, it’ll lead you to ‘My Domains’, where every detail about your domain will be listed.
- Click on the green icon saying ‘Active’.
- The ‘Managing Domain’ page will reflect up, showing the DNS Management option on the left column of the webpage.
- Click on the ‘DNS Management’, and then the next page will ask you for your:
- Host Name
- Record Type (Choose the record type ‘A’)
- Server IP Address


Fill in the details like this:
- Click on the ‘Save’ option, and you’ll be done pointing your domain to the Server IP.
Option 2:
Through Cloudflare
Pointing your domain to Server can be done with some simpler steps through Cloudflare! It’s a simple and easy-going process which doesn’t take much time.
As for now, go through all the steps to point your domain name to Server by going through Cloudflare’s tutorial guide.
The link is mentioned below:
https://developers.cloudflare.com/fundamentals/get-started/setup/add-site/
These were the steps you had to take to successfully point your domain to the Server IP!
3. Connect your VPS Server with ServerAvatar
The following steps won’t take much time to connect your VPS server with Server Avatar:
- Log in to ServerAvatar Dashboard. If you do not have an account with them, create one and if you do, fill in your credential to move ahead.

Fill in the correct details and click on ‘Login’. The dashboard will start appearing and will look something like this:
Click the option of ‘Server’ on the top right corner of the ServerAvatar Dashboard.
This will direct you to a page where you’ll be asked to select a provider. Choose the web service provider you want in the next step.
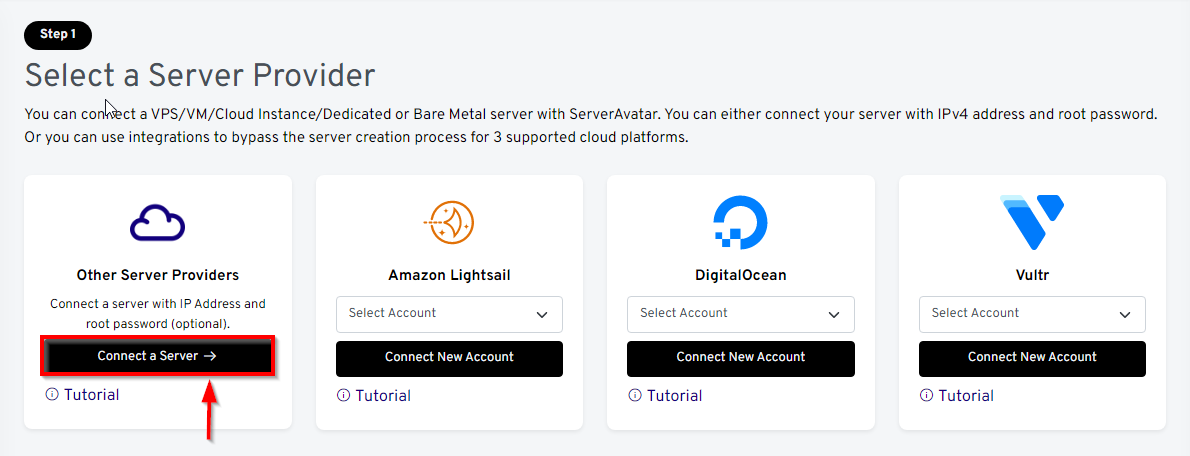
Click on ‘Other Server Provider’. To choose from the three available options and fill in other details and requirements as asked:
- Server Name
- Select an appropriate web server as per your requirement.
- IPv4 address
- Root Password
- Tick the box saying, ‘I have a root password.’

Click on ‘Connect Now’, and it will start installing and configuring your package.
It’ll take a couple of minutes for ServerAvatar to install and configure required applications and modules to ensure the smooth running of your website or application.
It’ll appear to be something like this:

Now, you have successfully connected your VPS server with ServerAvatar.
4. Setup WordPress website using ServerAvatar
Further, you’ll be re-directed to your Application Dashboard!
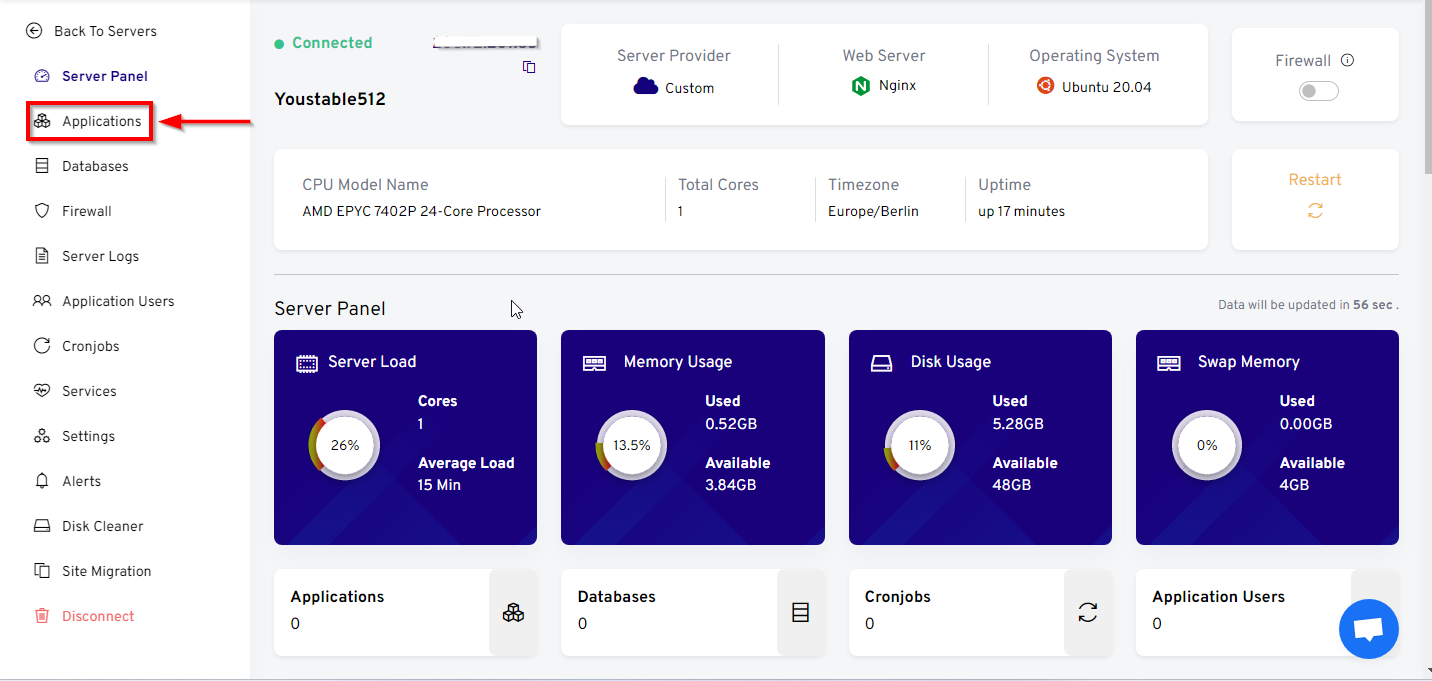
- Click on the ‘Applications’ from the left column.
- The next page will lead you to the option of creating your application.
- After clicking on ‘Create’ it’ll lead you to a page where you’ll have to enter the following details of your application:
- Application Name
- Primary Domain
- Application Type
- WordPress Title
- Email (to write this is optional)
- WordPress Username and Password
- Tick the ‘Show Advance Option’


Finally, click on the blue box with ‘Create Application’ written on it. Your application’s information will get saved.
- Move to your dashboard. This is the Dashboard where you will be able to go through important information about SSH/SFTP and more.

You can disable and enable the options as per your choice.
- After the successful creation of your WordPress website, you’ll need to propagate your DNS through Cloudflare to run your website without interruption.
Click on ‘Cloudflare’ appearing on the left panel on the dashboard.
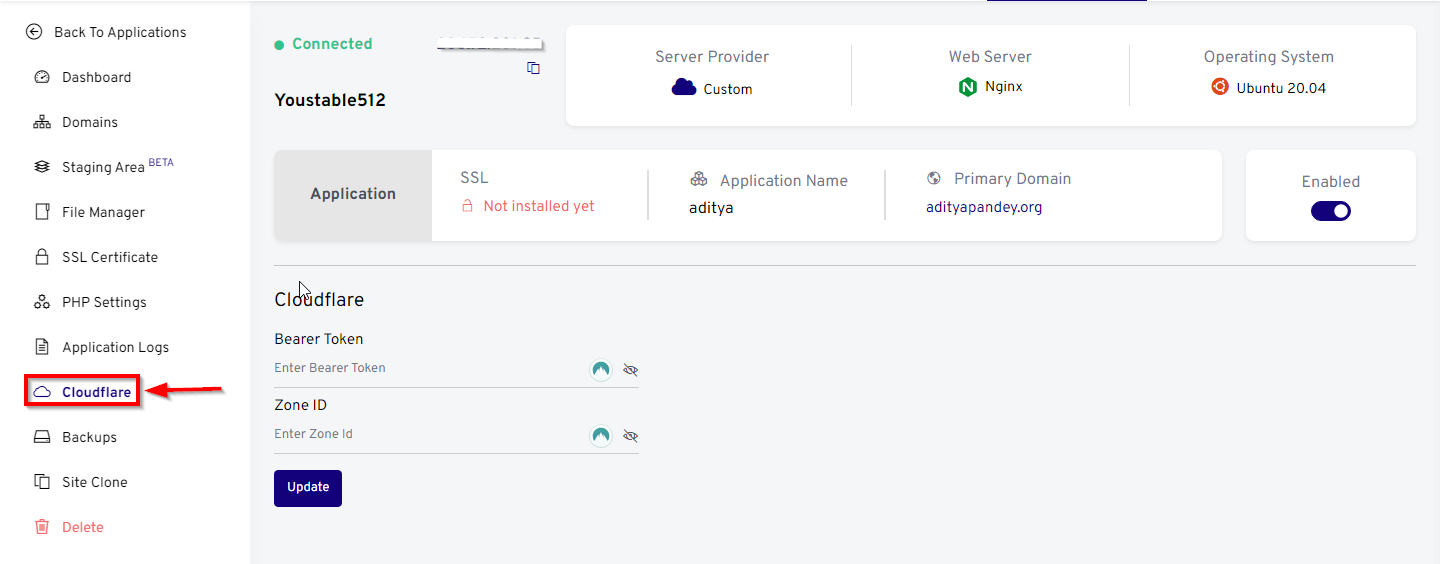
- You will have to create a Bearer Token and Zone ID first. And to do so, we have again shared some links so that we can make it easy for you to create them without wandering around directly.
- How to create Bearer ID: https://developers.cloudflare.com/api/tokens/create/
- Where to look for the Zone ID: https://developers.cloudflare.com/fundamentals/get-started/basic-tasks/find-account-and-zone-ids/
- Your DNS propagation process will be processed and successfully administered after these steps. To check so:
- Go to ‘Domains’ appearing under the ‘Dashboard’ option.
- Besides your ‘Domain Name’ and under ‘DNS’, you’ll see a ‘grey dot’, and as soon as this turns into a ‘green dot’, it’s confirmed that your domain was successfully propagated!
It’ll look something like this:
Congratulations! You have successfully set up your WordPress website using ServerAvatar, and it is ready to run on the internet after this!
Benefits of Using ServerAvatar
Advantages of using Server Avatar:
- It can help you save time by installing WordPress in a matter of minutes.
- Adding numerous websites to the same server is simple. As a result, you will save money.
- Optimized for maximum efficiency.